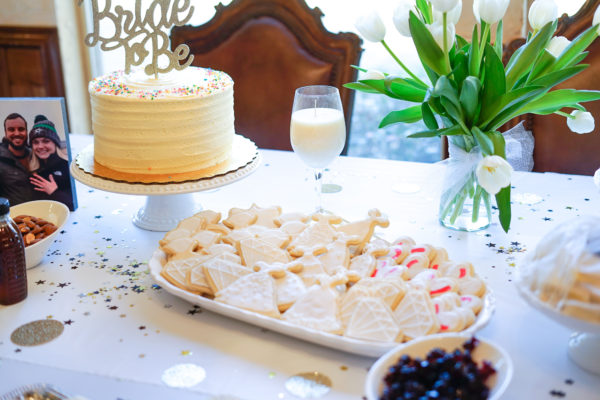
If there’s one skill I swore I’d master after having kids, it’s a good sugar cookie. None of those fluffy slice and bake kinds. The moist, thin cookies in precise shapes with beautiful icing decorations.
Now, I’ve never been much of an artist. I can’t draw, paint, or skillfully write in cursive. In other words, I have zero skills that might be a pre-requisite for Instagram-worthy cookies – but, I’ve got a steady hand and crazy determination. And YouTube.
Lots of YouTube.
After a little trial and error, I landed on a sugar cookie recipe from Sally’s Baking Addiction. I should have known to start with her recipes. Her Biscoff bar recipe is the hit of every party I’ve brought them to and her cake batter cookies are dreamy delicious. She can do no wrong, in my book.
My favorite icing recipe is actually the one on the back of the Wilton’s meringue powder. I’ve been using it for years and it’s never failed me!
My first attempt at these cookies were for my sister’s wedding shower and while I’m so happy with how they turned out, I also learned a lot.

1 // Thin shapes, like the stems on the champagne glasses, are prone to breakage and harder to ice than thicker shapes.

2 // You’ve got to get the thickness just right, or you’ll deal with puffy cookies the icing rolls off or more breakage.
3 // Cold dough is the best dough. It’s easy to cut and ensures the cookie holds its shape while baking.
4 // Metallic icing is hard to master. Like insanely hard. I’ve got one more process to try and if that doesn’t work, I’m skipping it in future cookies.
5 // Sprinkles are fun, pretty, and a great additive to any otherwise plain cookie, without having to pipe small details.

For E’s Somebunny is One birthday, I originally had these grand plans of bunnies, number ones, the letters of her name, and frames – but on the advice of my husband, reduced the plan down to just bunnies and hearts made with one of my favorite cutter sets EVER (seriously – use them for everything!). They were all white floods with designs added in sprinkles, making them easy to execute quickly while still looking cute on the table.

See more of E’s Somebunny is One birthday party here.
In total, it took me about 2hours across 3 days to make 5 dozen cookies – and most of that time was icing.


Not bad for an amateur with no artistic skills, right?
Below I’ve rounded up my favorite tutorials and tools to help you master the perfect party-ready cookie platter.
1 // Start with this recipe from Sally’s Baking Addiction. Follow it exactly as written, including the almond extract. It’s her secret ingredient and it really adds an amazing flavor to the cookies.
2 // Use square chopsticks (like what you get with takeout) as a guide to get your dough the right depth. Yes, you can buy a fancy roller or a mat with raised edges to get all your cookies the same depth, or you can grab those chopsticks from the drawer and put them to good use. Lay them on their side (mine were exactly ¼”, my target depth) and use them as a guide for your rolling pin. Rotate them around the dough as you work so you’re still spreading it in multiple directions.
3 // Roll between two sheets of wax paper. You’ll get a smooth surface and not have to worry about the dough sticking to your rolling pin.
4 // Layer the rolled dough on a baking sheet with sheets of wax paper between layers and refrigerate before cutting. I also refrigerate cut cookies while the first pan is baking.
5 // Buy metal cutters. Plastic ones work but I’ve found are a little tougher to work with. Ann Clark cutters are my personal favorite, and they’re available on Amazon.
6 // Use the Wilton’s Royal Icing recipe. Meringue powder is so much easier to work with in this icing recipe, and it’s shelf-stable. My jar has lasted through more than 15 dozen cookies! Immediately cover your icing with a damp paper towel to keep it from drying out.
7 // Move about 1/2c frosting into a small bowl, and 1c into a second bowl. The smaller will be the icing for your lines while the inner will be your flood. Watch this video to learn how to get the perfect icing consistency.
8 // I used all white icing but this is the stage you would add your gel food coloring to the icing. This Wilton pack is great to have on hand for most projects, but if you want a specific color matched, opt for Ameircolor. I purchased Dusty Rose to match to our decor and love it!
9 // Get icing! There are so many great videos on YouTube to help you master your technique. My favorites are this one and this one!
CLICK HERE TO SHOP MY AMAZON COOKIE FAVORITES, including everything I used for E’s cookies!
