This post contains affiliate links. This does not increase the cost of items to you.
For years, the focal point of our formal dining room was a huge bar cart where my husband and I displayed some of our favorite bourbons and whiskeys from our travels and collecting adventures. As we transformed our formal living into her playroom, it didn’t seem to fit anymore. We live in a small historic bungalow in Old East Dallas with limited storage. We had to find another solution!
We came up empty after months of searching. Nothing fit our style, was appropriately childproofed, and had the storage capacity we needed. Then, while scrolling Pinterest, I came across images converted upright pianos and instantly knew that was what we had to do (C took a little more convincing).
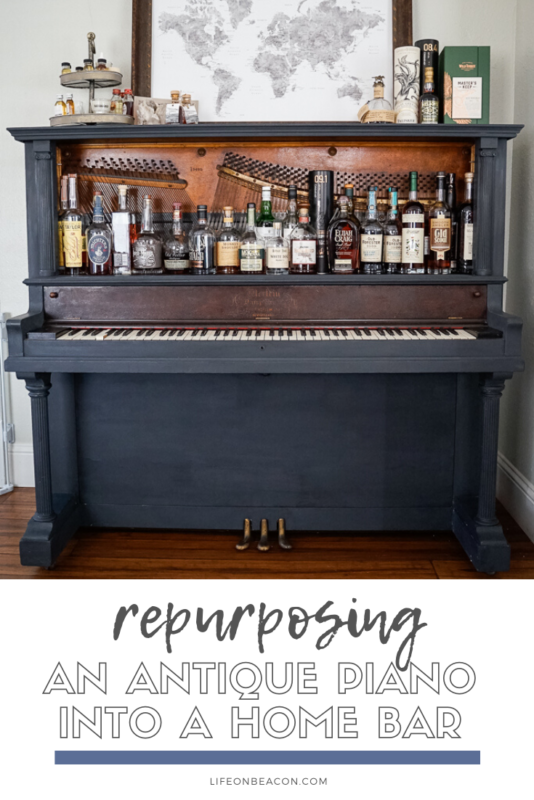
This beauty was purchased via Facebook Marketplace for $100 and dates back to 1910. It had dents in the side and was missing some strings and parts of the key mechanism.

The process of repurposing it into a home bar was an adventure but I am beyond thrilled with the outcome. The piece has great character, gives us tons of storage, and closed up, looks right at home in our formal living/playroom.
The DIY really wasn’t as hard as we thought it would be, either!


SUPPLIES
1 // A piano. You want to pick an upright for more storage, and ideally one that is 14” or more in depth on top. We also looked for pianos that already had fliptops and a compartment concealing the lower chambers to avoid building doors. You can go with other styles, however note you may be biting off more carpentry.
2 // Microfiber rags (here) to wipe down the piano and clear it of any grime or dirt before starting, and to wipe down the piano again before painting. These also work great for applying the wax.
3 // Wood filler (here) to fill any gaps or gashes in the piano.
4 // Sand paper and sanding blocks. Start with a medium grit for any places you had to apply wood filler, then swap to a fine grit to get a smooth painting surface. I love these sanding blocks to make the process easier.
5 // Wood for shelves. We bought a 2×4 and a 1×6. The 2×4 was cut for shelf braces, and the 1×6 was used for the shelf itself. Both were cut to size to fit our piano, so it’s useful to determine what you need for shelves first.
6 // Chalk paint. We picked up BEHR’s new Chalk Decorative Paint (here) which can be custom-dyed to more than 200 colors (ours is Classic Noir). Note: We did not prime our piano because we were painting it a dark color and it was in good condition. If you’re painting a light color, or the piano has stains or residue on it, priming first will ensure the chalk paint applies better.
7 // Wax finish (here). We opted for a clear matte finish, however if you need something more durable, you could also go with a gloss.
8 // Angle brushes for the paint (here). Our piano also had decorative pieces so we used a few small craft brushes leftover from another DIY.


INSTRUCTIONS
1 // Begin dismantling your piano following this instructional from a piano technician. Our piano had a 100 year old cast iron harp we opted to leave in place, however you could remove it for more storage space and to make the piano significantly lighter. Make sure you label what came from where so you can get it back together later!
We had planned to turn the keys into more storage for bar accessories, but ultimately decided to keep them and I’m so glad we did! They have such a gorgeous look about them.

2 // Clean the piano of any dirt or grime, and fill holes or gashes with wood putty, sanding when dried for a smooth finish.
3 // Sand down any imperfections, then do a light, fine sand over the entire piano so the paint adheres well.
4 // Build your inset shelves. My husband cut small braces to enable the shelves to bear the weight of the bottles in the center, then cut boards that could sit on top. We have one shelf up top, above the keys and a second across the bottom, where previously the pedal mechanisms were housed. It was surprisingly easy to fit together!

Measuring to ensure the bottles would fit
5 // Paint the piano. Save yourself a lot of hassle by doing this before you put it back together.

6 // Let the paint dry, applying more coats if needed. When done, rub on the wax in small circular motions.
7 // Reassemble the piano as needed (we often leave the top cover off ours for easier access to our favorite bottles).
I’d love to see the results if you attempt this on your own! Link the images in the comments or tag me on Instagram – @ashley.hetrick.
Pin this


